

The Ultimate Guide to Building Your First Gaming PC
Building your first gaming PC can be one of the most rewarding experiences for any gamer. It allows you to customize your gaming rig to meet your exact needs, ensuring you have the best performance and experience possible. In this guide, we’ll walk you through everything you need to know to build your first gaming PC, from selecting components to assembly and optimization.
1. Why Build Your Own Gaming PC?
Before we dive into the specifics, let’s discuss why you might want to build your own gaming PC instead of buying a pre-built one.
- Customization: When you build your own PC, you can choose every component based on your preferences and budget. This customization allows you to create a system that perfectly fits your gaming style.
- Cost-Effective: Building your own PC can often be cheaper than buying a pre-built system with similar specifications. You can also upgrade specific components over time without replacing the entire system.
- Learning Experience: Building your PC helps you learn about the hardware and how it works together. This knowledge can be invaluable for troubleshooting and future upgrades.
- Satisfaction: There’s an unparalleled sense of achievement in completing a build. It’s gratifying to see your custom system come to life and perform exactly as you envisioned.
2. Essential Components for Your Gaming PC
2.1 Central Processing Unit (CPU)
The CPU is often referred to as the brain of your PC. It processes instructions and manages tasks. For gaming, you’ll want a powerful CPU to ensure smooth performance. Look for CPUs from brands like Intel (Core i5, i7, or i9) or AMD (Ryzen 5, 7, or 9).
2.2 Graphics Processing Unit (GPU)
The GPU is critical for gaming, as it renders images and graphics. A good graphics card ensures high frame rates and stunning visuals. NVIDIA (GeForce RTX series) and AMD (Radeon RX series) are the leading brands in the market. Depending on your budget and gaming requirements, you may opt for a mid-range or high-end GPU.
2.3 Motherboard
The motherboard is the backbone of your PC, connecting all components. Ensure compatibility with your CPU and GPU. Choose a motherboard with the right chipset that supports your desired features, such as overclocking and multiple GPU setups.
2.4 Memory (RAM)
RAM is essential for multitasking and running games smoothly. For gaming, a minimum of 16GB is recommended. Look for DDR4 memory with a speed of at least 3200MHz. Opt for dual-channel kits for better performance. Like our articles? Read also about Psychology of Games.
2.5 Storage
Storage options include Hard Disk Drives (HDDs) and Solid State Drives (SSDs). SSDs offer faster load times, making them preferable for gaming. A combination of an SSD for your operating system and frequently played games, along with an HDD for additional storage, is a common setup.
2.6 Power Supply Unit (PSU)
The PSU supplies power to all components. It’s crucial to choose a reliable and efficient PSU to ensure system stability. Look for units with an 80 Plus certification for energy efficiency. Ensure it has enough wattage to support your components.
2.7 Case
The case houses all your components and determines your PC’s aesthetics. Choose a case that fits your motherboard size (ATX, Micro ATX, or Mini ITX) and has good airflow for cooling. Additionally, consider the aesthetics and any RGB lighting options.
2.8 Cooling System
Cooling is essential to keep your components running efficiently. You can choose between air cooling and liquid cooling. Air coolers are generally easier to install and maintain, while liquid coolers provide better cooling performance for high-end builds.
3. Tools You’ll Need
Before you start building, gather the necessary tools:
- Screwdrivers: A Phillips-head screwdriver is essential.
- Anti-static wrist strap: To prevent static electricity from damaging components.
- Cable ties: For cable management.
- Thermal paste: If your CPU cooler doesn’t come with pre-applied paste.
- Good lighting: To see your components clearly.
4. Step-by-Step Building Process
4.1 Prepare Your Workspace
Find a clean, flat surface with good lighting. Lay out all your components and tools for easy access.
4.2 Install the CPU
- Open the CPU socket on the motherboard by releasing the lever.
- Align the CPU with the socket, ensuring the triangle markings match.
- Gently place the CPU in the socket and secure the lever.
4.3 Install the RAM
- Locate the RAM slots on the motherboard.
- Open the clips on the RAM slots.
- Align the RAM sticks with the notch in the slot and press down firmly until the clips snap back into place.
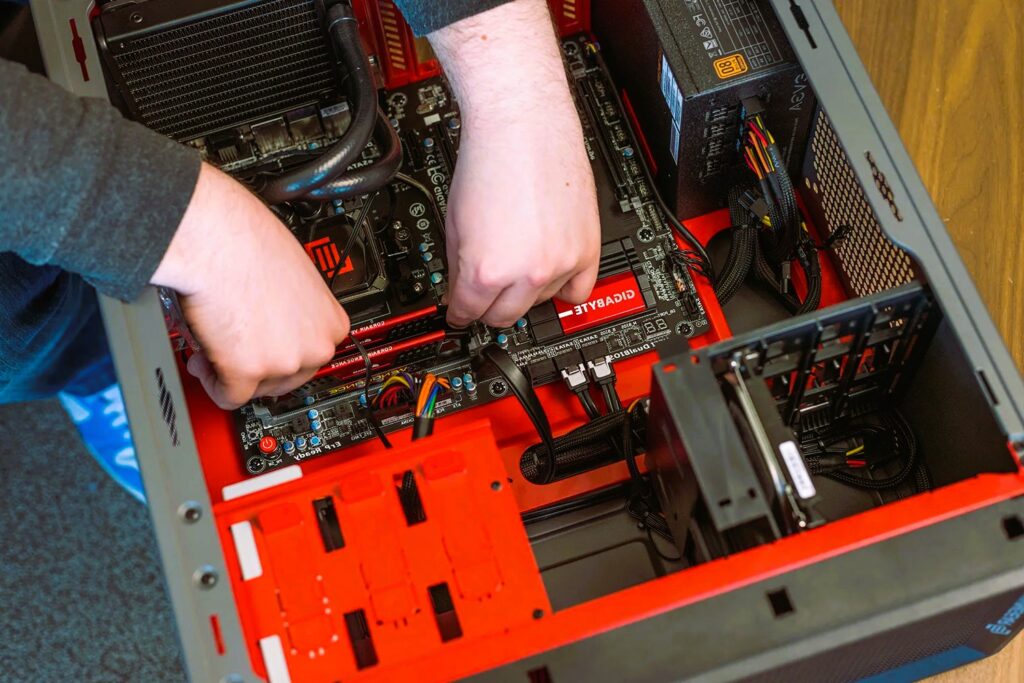
4.4 Install the Motherboard in the Case
- Place standoffs in the case to match the motherboard holes.
- Align the motherboard with the standoffs and secure it with screws.
4.5 Install the Power Supply
- Insert the PSU into the designated area in the case (top or bottom).
- Secure it with screws and route the cables through the back for better cable management.
4.6 Install the GPU
- Locate the PCIe slot on the motherboard.
- Remove the appropriate backplate from the case.
- Align the GPU with the slot and push it in firmly.
- Secure it with screws.
4.7 Install Storage Drives
- Depending on the case, install SSDs in the 2.5-inch bays or HDDs in the 3.5-inch bays.
- Connect the drives to the motherboard using SATA cables and power cables from the PSU.
4.8 Cable Management
Organize your cables to improve airflow and aesthetics. Use cable ties to bundle cables together and route them neatly through the back of the case.
4.9 Final Checks
Before closing the case, double-check all connections and ensure components are securely installed. Make sure no tools are left inside the case.
4.10 Power On
Once everything is in place, connect your monitor, keyboard, and mouse. Power on your PC and enter the BIOS to ensure all components are recognized.
5. Installing the Operating System
After successfully powering on your PC, it’s time to install your operating system. Most gamers prefer Windows for compatibility with a vast array of games.
- Create a bootable USB drive: Use tools like Rufus to create a bootable USB drive with the Windows installation media.
- Boot from USB: Restart your PC and enter the boot menu to select the USB drive as the boot device.
- Follow the installation prompts: Choose your language, region, and install Windows on your primary drive.
6. Optimizing Your Gaming PC
Once your operating system is installed, you’ll want to optimize your gaming PC for the best performance.
- Install Drivers: Download and install the latest drivers for your GPU, motherboard, and peripherals.
- Update Windows: Ensure your operating system is up to date with the latest updates and security patches.
- Configure Game Settings: Adjust in-game settings for optimal performance based on your hardware capabilities.
Building your first gaming PC can be an exciting and fulfilling endeavor. By following this guide, you’ll have a solid understanding of the components needed, the assembly process, and how to optimize your system for gaming. Remember, the gaming community is vast, and resources are plentiful, so don’t hesitate to seek help and advice from fellow gamers. Enjoy your new gaming rig!
For more detailed information on computer components and standards, visit the Wikipedia page on PC Components.